Dash painting

Silcoupe

New Member
hey guys, i'm new to aus lancer and have been browsing through the members pictures and am very impressed, i own a 99 CE MR II, and this forum has helped me decide on a lot of ideas for my car, and i've wanted to have my dash coloured white in some areas like around the headunit, air vents, gear stick/handbreak, and AC controls. i wanna paint these gloss white coz i reckon they look pretty mint.

Now i was wondering if it's as easy as buying the correct paint from the shops, pull out the dash myself and spray it, or would it be better to take it down to a place that does interior work and let them handle the whole thing, just looking to save some cash that could be used on other future mods.

thanks :)
 
1st off welcome :)

now if you know how to take the parts out of the car without breaking them etc then thats a good start

so being plastic you would need a flexi prime,gloss white & a clear coat aswell as some 400,800,1000 grit wet & dry(pretty sure you know the steps of painting??) also want to prepwash after sanding

so probaly best to go get a qoute from the shop you had in mind & then sum up how much it would cost to get all your paint etc & if you have the time to paint it & take the parts out

GL :thumbup:
 
well you would wanna have spare pieces of dash ur going to paint just incase it turns out sh*t
and its alot of trial and error as i have seen

if you are after somethign like zis, then where it is white they have fibreglass'ed or sanded it down smooth and applyed some glossy white paint (maybe car paint i dunno)
i think they used fibreglass in this one to smoothe it b4 paint went on, then get some good paint and do primer and layer on the paint sanding in between layers then a clear coat
mypic70.jpg

(referance pic from the storm trooper mirage)

you will wanna get a spare piece of dash as a test piece first to see if u can get the right finish
it shouldnt be too hard if u take ur time and plan it out well

im planning on doing this exact thing to my car in the future, so i had a bit of a research myself
 
yea i reckon i'll head down to a wrecking yard and grab some old panels and try it on them, that picture is great, basically exactly what i want to do :D maybe a few less gauges tho :3 thanks for the help, hopefully i'll get started right after the new year, if u end up doin this before me send me a PM with any pointers or i'll do the same if i start first :D haha
 
lol i wont end up doing this any time soon, got alot of other stuff thats on priority b4 the dash

but let me know how urs goes if u end up doing it
 
i did all the painting of my dash myself its not really that hard i just reccomend doing it with a spray gun & 2pac paint is good but you need a proper oven to bake it(as i learnt with my mirrors)

feature021.jpg


& with that strom trooper mirage they also could have just loaded it up with primer filler & keept sanding it down after a few coats :think:
 
what went wrong with ur mirrors? whats with the 'proper' oven and how come everything else turned out okay without a 'proper' oven?
 
I'd stay away from 2-pack, just because of the iso-cyanates in the formulation.... that stuff is deadly with too much exposure.
 
resuliac said:
what went wrong with ur mirrors? whats with the 'proper' oven and how come everything else turned out okay without a 'proper' oven?

the mirrors got heaps off dust & heaps of "orange peel" in them because they took 2 days to set & interior was all done with acrylic & it turnded out shiny if not shiner then the mirrors & a proper oven is them big things they put cars in when they paint them so no dust gets in the paint & they set heaps quicker
 
tryg said:
I'd stay away from 2-pack, just because of the iso-cyanates in the formulation.... that stuff is deadly with too much exposure.

tell me about it knocked me for a loop when i did the mirrors & i was in a very open space
 
All my stuff is 2 pac, doors are semi FG, but as said you can primer filler it all to get it smooth. If your not looking for a pro finish, then you can save big bucks just by cleaning it really well and spraying it with cans. It can flake and scatch easy with this method, but its only cheap cans and the parts your looking at doing come off so easy so you can just sand a repaint in 1/2 day if needed
 
2k is fine to use but you do need the proper breathing aparatus and at least proper ventilation. You do not want to breath any of this stuff in when spraying clear or primer.

In terms of baking, there are fast hardeners you can use if you don't have an oven. Orange peels can be removed easily with 1200, then 2500 grit paper.

Before you spray, get some scotch Brit and creme cleanser to clean and scuff up the surface. You also want to ensure you use plastic primer to promote adhesion.

Coating with fiberglass is not good if you want a smooth finish. Filling with primer filler and sanding back will last a lot longer and is less likely to crack.

For the record, 2k kills acrylic any day of the week. Hehe.
 
picture002ee.jpg

I went the other way from some of you & have done mine with cans getting on to 2 yrs ago now with no bubbling, peeling, flaking etc as this was the cheapest way & only way(no access to a gun & compressor) for me to do it.
All the blue & darker black is a can job, the blotchy looking dash was the result of 4 layers of matt black last xmas that just did not work.

The key as has been said b4 is in the prep work & patience.
I used K&H greese & wax remover on the parts after giving them a good scrub in warm water & soap with a scourer.
Flexi prime from auto one
The blue is metalic exterior touch up can paint
Then cleared over the top with K&H clear

The way I do it is light coat, med coat then final coat with primer, paint & clear & give it plenty of time in between to dry properly.
When i've tried to hurry things & put on too much or put on another coat too soon it hasn't worked out & har to strip it & start again.
 
Top job with cans! There is no substitute to a good HVLP gun and a compressor, good quality paint and a booth.... but, you can see above that a good finish is possible with cans. No doubt its all in the preparation. I have all the gear but still find cans an attractive medium, because you don't have to buy large quantities of paint.

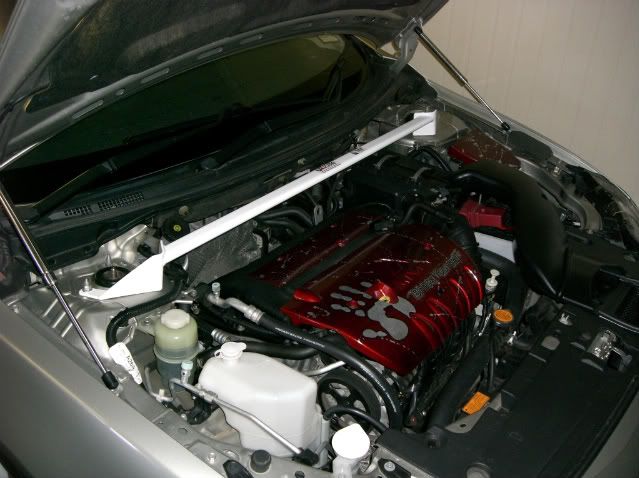
I painted my under bonnet engine covers with cans, 10-12 layers (candy red over silver, with sprays of silver over the top), in the most inhospitable environment (the engine bay!).

All-in-all, a good finish can come from either, its all up to the operator.
CIMG0531.jpg
 
ozz said:
picture002ee.jpg

I went the other way from some of you & have done mine with cans getting on to 2 yrs ago now with no bubbling, peeling, flaking etc as this was the cheapest way & only way(no access to a gun & compressor) for me to do it.
All the blue & darker black is a can job, the blotchy looking dash was the result of 4 layers of matt black last xmas that just did not work.

The key as has been said b4 is in the prep work & patience.
I used K&H greese & wax remover on the parts after giving them a good scrub in warm water & soap with a scourer.
Flexi prime from auto one
The blue is metalic exterior touch up can paint
Then cleared over the top with K&H clear

The way I do it is light coat, med coat then final coat with primer, paint & clear & give it plenty of time in between to dry properly.
When i've tried to hurry things & put on too much or put on another coat too soon it hasn't worked out & har to strip it & start again.
Hey guyz new to the whole painting thing, just have a question sorry if its stupid.. But where your door trim cloth is actually blue, do you remove the trim and paint under, paint ontop or just change the material..?
 
that panel is attached separately to the door card, hence why it is called an insert.

detach the insert, undoing the multiple screws, then either remove the current material, sand it back to clean and then apply the pre-glued new material to the same area.

I did mine in leather and this is the exact procedure I used. Although I did not remove the current material, choosing to apply the leather straight over the material. I used Selleys Kwik Grip. Let it dry to tacky and follow all instructions for best results.

Good Luck.
 
I think the question related to where material can be placed.. not what it was.. but if you can remove it from the door card, you can wrap it.

Don't just put material over plastic, you probably need an interfacing (such as really think foam rubber) to go down under the material, or it might show glue through.
 
Back
Top